Temporary Crown Procedure: What Happens, How Long It Takes, and Aftercare Tips

Revisado por Dr. Dennis Rollins, DDO |
Julio de 2025 - 6 min Leer
Reviewed By Dr. Dennis Rollins, DDO | Julio 2025 - 6 min Read
A permanent crown can take several weeks to make. A temporary crown is used to protect the tooth in the meantime while maintaining proper spacing to ensure the permanent crown fits properly.
This process requires at least two appointments, and it all starts with finding the right dentist in your area. For help with that, click aquí o llámenos al (888) 597-3896.
| Característica | Postextracción normal | Enchufe seco |
|---|---|---|
| Inicio del dolor | Comienza inmediatamente después de la extracción, normalmente de leve a moderada | El dolor suele comenzar 2-4 días después de la extracción, aumentando en intensidad |
| Tipo de dolor | Sordo o palpitante, disminuye gradualmente con el tiempo | Fuerte, agudo o pulsátil, puede irradiarse al oído, ojo o mandíbula. |
| Coágulo de sangre en el lugar de extracción | Coágulo de sangre intacto, la cuenca parece protegida. | Fuerte, agudo o pulsátil, puede irradiarse al oído, ojo o mandíbula. |
| Coágulo de sangre en el lugar de extracción | Coágulo de sangre intacto, la cuenca parece protegida. | Coágulo parcial o totalmente ausente: la cavidad puede parecer vacía. |
| Sabor u olor | Sin sabor ni olor extraños | Mal sabor o mal aliento por la exposición del hueso y la actividad bacteriana |
| Hinchazón | Hinchazón leve que disminuye gradualmente | Puede haber hinchazón, pero el dolor es desproporcionado con respecto a la apariencia |
| Curación | Las molestias disminuyen cada día | El dolor persiste o empeora después de los 2-3 primeros días |
| Hueso en el lugar de extracción | Raramente visible | A veces visible |
| Postextracción normal | Enchufe seco |
|---|---|
| Inicio del dolor | |
| Comienza inmediatamente después de la extracción, normalmente de leve a moderada | El dolor suele comenzar 2-4 días después de la extracción, aumentando en intensidad |
| Tipo de dolor | |
| Sordo o palpitante, disminuye gradualmente con el tiempo | Fuerte, agudo o pulsátil, puede irradiarse al oído, ojo o mandíbula. |
| Coágulo de sangre en el lugar de extracción | |
| Coágulo de sangre intacto, la cuenca parece protegida. | Fuerte, agudo o pulsátil, puede irradiarse al oído, ojo o mandíbula. |
| Coágulo de sangre en el lugar de extracción | |
| Coágulo de sangre intacto, la cuenca parece protegida. | Coágulo parcial o totalmente ausente: la cavidad puede parecer vacía. |
| Sabor u olor | |
| Sin sabor ni olor extraños | Mal sabor o mal aliento por la exposición del hueso y la actividad bacteriana |
| Hinchazón | |
| Hinchazón leve que disminuye gradualmente | Puede haber hinchazón, pero el dolor es desproporcionado con respecto a la apariencia |
| Curación | |
| Las molestias disminuyen cada día | El dolor persiste o empeora después de los 2-3 primeros días |
| Hueso en el lugar de extracción | |
| Raramente visible | A veces visible |
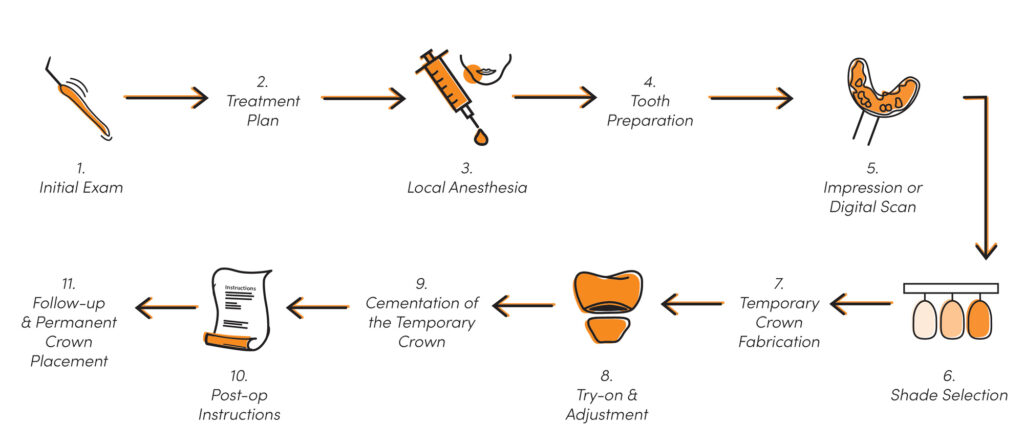
What to Expect When Getting a Temporary Crown
- Initial exam: Your dentist will examine the tooth to check for decay or infection. They will usually take an X-ray to confirm that the root and surrounding bone are healthy enough for a crown.
- Treatment plan: Your dentist will explain options, answer your questions, and obtain your consent for treatment.
- Anesthesia: Local anesthetic will be used to numb the tooth and surrounding gums.
- Tooth preparation: Your dentist will trim and shape the tooth so the crown fits properly.
- Impression or digital scan: A physical impression (using putty) or an intraoral digital scan will be taken of the tooth and adjacent teeth to make the permanent crown.
- Shade selection: The dentist will select the crown shade that best matches your teeth.
- Temporary crown fabrication: The temporary crown will be made either chairside from acrylic/composite or quickly fabricated in the office’s lab from a preformed shell filled with temporary material.
- Try-on and adjustment: The temporary crown will be tried on, trimmed, and adjusted for fit and bite, so that it feels comfortable and doesn’t interfere with chewing.
- Cementation of the temporary crown: Your dentist will attach the temporary crown with temporary cement, which will hold it in place while allowing easy removal later.
- Post-op instructions: You’ll be given care instructions, such as avoiding sticky or chewy foods, not chewing with the temporary crown, and gently brushing and flossing.
- Follow-up and permanent crown placement: Typically, 1-3 weeks after your temporary crown, it will be replaced with the permanent crown. Fit and color will be checked, any needed adjustments will be made, and the permanent crown will be secured in place with a strong, long-term cement.
Caring for Your Temporary Crown
Your temporary crown shields exposed dentin, reduces sensitivity, and prevents the tooth from shifting. Any movement can cause the final crown to fit incorrectly and might require the dentist to redo the putty impression or digital scan.
Good care also minimizes the risk of the temporary becoming loose or dislodged, which can lead to pain, gum irritation, or damage to the tooth underneath. Here’s what to do (and not to do) as you wait to get your permanent crown in place.
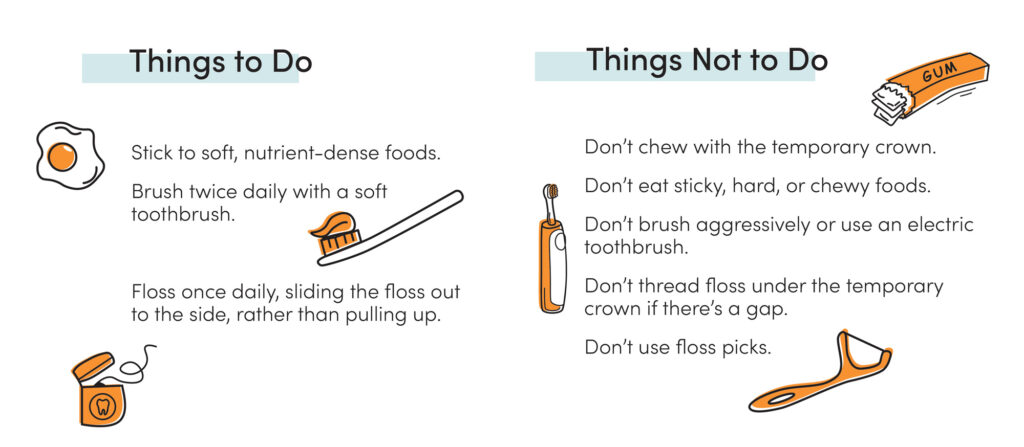
Things to Do
Eating
- Stick to soft, nutrient-dense foods, like eggs, pasta, yogurt, cooked vegetables, and rice.
- Cut food into small pieces.
Brushing
- Brush twice daily with a soft toothbrush.
- Use fluoride toothpaste to help with sensitivity.
- Use gentle pressure around the temporary crown.
- Angle the brush at 45 degrees to clean along the gumline.
Flossing
- Floss gently once daily.
- Use regular string floss for better control.
- Slide the floss down between the teeth and then pull it out to the side, rather than up.
Things Not to Do
Eating
- Don’t chew with the temporary crown.
- Don’t eat sticky foods, like caramel, gummies, taffy, or chewing gum.
- Don’t eat hard or crunchy foods, like nuts, ice, chips, or raw carrots.
- Don’t eat tough or chewy foods, like steak, jerky, or bagels.
Brushing
- Don’t scrub aggressively at the gumline around the crown.
- Don’t use an electric toothbrush.
Flossing
- Don’t snap floss up and out, which can pull the crown out of place.
- Don’t use floss picks.
- Don’t thread floss under the temporary crown if there’s a gap.
Normal Symptoms After Getting a Temporary Crown
These symptoms are common and typically last 1-3 days, improving each day.
1. Mild–to-moderate soreness or aching
- It will usually feel like a bruised or tender sensation around the tooth and gums.
2. Brief temperature sensitivity
- Cold air and cold or hot drinks and food might cause mild pain.
- It should only last a few seconds once the stimulus is removed.
3. Mild gum irritation
- Slight redness, soreness, or minor bleeding might occur when brushing.
4. Temporary crown feeling a bit high
- Your bite might feel slightly different at first, but should feel more normal as the temporary crown settles.
Signs You Should Call Your Dentist
If you experience any of the symptoms below, it’s best to contact your dentist right away.
- Persistent or worsening pain
- Long-lasting sensitivity to hot, cold, or sweet food
- Sharp pain when biting or chewing
- Swelling, warmth, or a pimple-like bump on the gums
- Fever or a foul taste
- Your temporary crown becomes loose, falls off, or moves
None of these symptoms indicates an emergency, but prompt treatment from your dentist will prevent the issue from becoming worse.
What to Do If Your Temporary Crown Falls Off
The first and most important step is to make an appointment with your dentist. They’ll clean the crown and tooth, adjust the fit if needed, put the crown back on or replace it with a new one, and check your bite.
Here’s what to do at home while you wait for that appointment.
1. Keep the crown and tooth clean
- Rinse the crown gently with water.
- If debris is inside the crown, use a cotton swab or soft toothbrush to lightly clean it.
- Do not scrub aggressively or use chemicals, toothpaste, or alcohol on the crown.
2. Rinse your mouth
- Use a mild saltwater solution (half of a teaspoon of salt mixed in one cup of warm water). This soothes the area and helps prevent bacteria.
3. Stick to soft food
- Try not to chew with the affected tooth.
- Avoid very hot, cold, and spicy food and liquids, which can spike sensitivity.
4. Check the crown for damage
- If it’s cracked, broken, or warped, do not try to re-seat it yourself. Store it in a small container or plastic bag and bring it to your dentist.
- If the crown looks intact and the tooth is not painful, you can try temporarily re-seating it using the safe steps below.
5. (Optional) Re-seat the crown
This is a stopgap measure to help protect the tooth, reduce sensitivity, and keep the crown from being lost. You’ll still need to see your dentist as soon as possible.
- Dry the inside of the crown.
- Place a pea-sized amount of denture adhesive inside the crown.
- Gently place the crown onto the tooth in the correct orientation.
- Press lightly for a few seconds.
- Bite down gently to confirm the crown feels like it did before.
This will hold the crown in place while still allowing the dentist to remove it easily.
If the tooth is very sensitive, you can try the same process using petroleum jelly instead of denture adhesive. This solution is less secure, but it can help provide a temporary barrier until you can get to your dentist.
If the crown won’t stay on, do not force it. Just store it in a container until your dentist appointment.
¿Necesita ayuda para encontrar un dentista?
Información relacionada

¿Cuánto cuesta una visita al dentista sin seguro? Costes exactos
A continuación encontrará un desglose de los gastos de bolsillo típicos de los procedimientos dentales más comunes, junto con las razones que los justifican. Tenga en cuenta que estos costes pueden variar significativamente en función de su ubicación, la experiencia del dentista, los materiales utilizados y la complejidad del procedimiento.

¿Debe acudir a urgencias por dolor de muelas? Guía rápida
La conveniencia de acudir a urgencias por dolor de muelas depende de la gravedad del dolor y de los demás síntomas que experimentes. Sigue leyendo y te ayudaremos a decidir cómo aliviarte.
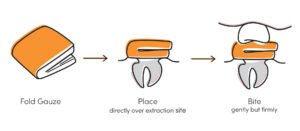
Cómo detener el sangrado después de la extracción del diente: Consejos fáciles para un alivio inmediato
Tras la extracción de un diente, es normal que se produzca una hemorragia en la zona, que suele remitir en 2-3 horas. Durante las primeras 24 horas suele seguir supurando suavemente (saliva rosada). A continuación encontrarás consejos para ayudar a detener la hemorragia y cómo diferenciar entre una recuperación normal y los signos que indican que debes llamar a tu dentista.